As I mentioned in my last post, I made my first pair of trousers at the weekend. I'd been out all day and realised on my way home that I didn't have the trousers I'd been intending to wear for the punting trip made yet. I had 2 choices, make a pair in one evening or wear something old. So it was that I came to be sewing late into Saturday night!
 |
| Deryn 'helping' me cut out |
I started at 6pm, cutting out my pattern pieces. As I knew I had fitting issues with simplicity 3688, I decided to try my 'tried and tested' pattern, Eva Dress 650 which has some loose fitting 1930s trousers. Given how simple the blouse is, I was hoping that the trousers might be easy to put together too!
I cut out the pattern pieces and then used them to make a very rough toile while we watched Torchwood. As it ended I whipped the pieces through the machine and tried them on. Miracle - they were a perfect fit! No adjustments needed!
I cracked on with the cutting out, going more slowly this time as I didn't want to ruin my lovely fabric, a linen mix in blue and white stripes that I bought for a song at the Nylon Shop in Kingswood, Bristol. It still had a sticker on one end from Italy, presumably where it's from. This linen is fine but in a very tight weave, giving it some weight, but is as soft as most vintage linens I've come across. I was really paranoid about messing this up!
The pieces went together very easily. There are 4 darts front and back and then the regular seams to sew up. One piece has a 'tab' at the side waist for the opening which I sewed up to. I wanted to use buttons to fasten these and not the press studs that are suggested, so I faced one side of the opening and used the tab to face the other.
 |
| Button holes could do with tidying up... |
I overlocked pieces as I went which probably sped things up because I wasn't stopping to carefully finish seams. It was a bit mad as the overlocker merrily cut the fabric - lose concetration and you end up missing a chunk of your trousers!
The waistband was a bit of a trial - it's cut out in 2 pieces and then the instructions get very vague about how it all goes together. I improvised and just stitched the 2 pieces together and binged it on, but I think it may have a more refined approach if you take the time to figure it out. It was about 10pm by this point though and I just wanted the trousers finished!
 |
| Look how tidy the inside is! |
The turnups are so simple. The hem it turned to the inside and stitched about 2 inches in. The resulting cuff is then turned back to the outside and sitched on the side seams. After I'd pressed them, they stayed up all on their own! I could have made the turnups a bit deeper as it turned out. I was paranoid about making them too short but as it is they are slightly on the long side. For someone of 5'9 using a 1930s pattern, this is pretty impressive!
I'm amazed at how wide the legs are - 14" each! They billow as you walk :)
The only really tricky parts were the tab bit or the side opening and the waistband construction. Sadly the instructions are vague enough that I couldn't work them out in my half asleep state, but my bodge job seems to have worked just fine.
I finished sewing the button holes at a bit before 11 - 5 hours after I'd started cutting out the pattern pieces and toile. As I stopped for a dinner break we can probably say that's 4 1/2 hours work.
I sewed on the buttons and hand stitched the inside of the waistband down in the car journey to Oxford, so that's about another hour's work, although I could have 'stitched in the ditch' has I been at home and saved myself about 50 minutes.
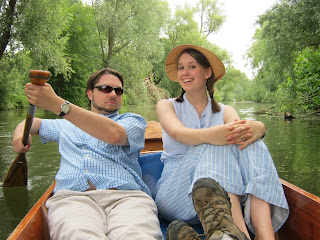
And here I am enjoying the fruits of my labour!
The trousers are so big and the fabric so light that they were perfect for the scorching day we had. They're also very comfy, being huge and unfitted at the waist, so again great for sitting around in the heat.
The crotch is surprisingly low - as 1930s trousers for lounging I suppose that's to be expected. This means that there's plenty of space for my 'full derriere' as it's delicately put, and when sitting they don't ride up at all.
The waist fits nicely and the darts shape the top 2-3 inches, but after this the trousers just hang. No fitting required!
These are absolutely wonderful trousers and, like the blouse (which I'm also wearing here - entire outfit from one pattern!), are simple enough that I can see myself making various adjustments to get new pairs in the future.
I think I will be making these again in a soft fabric specifically for lounging in - they're like pj bottoms but much smarter.
If I made them for work or something similar, I'd probably raise the crotch by about an inch, just to take some of the excess out and narrow the legs by an inch or 2 as well. Otherwise I'm pretty happy with these as they are! This pattern really does come highly recommended - for the cost you get 2 very simple, very effective patterns which are both simple enough for beginners to tackle. The only thing that lets them down is the 1930s style instructions which are pretty vague and not terribly well explained, but anyone who's made 2 or 3 garments before should be able to figure them out.


