Monday, 29 November 2010

Ah, on the sofa at last.
I've had my Mum staying this weekend and today has been exhausting. We (along with 68,000,000 other people) went shopping. I love shopping but today has put me off leaving the house for several months to come. Still, I had a very enjoyable trip to John Lewis' Haberdasher, where I finally bought some wool for the jumper my Mum's knitting me, and some sewing supplies, including my first pair of pinking shears! While we were browsing, I saw this book
There are 8 'vintage inspired' patterns in it and I really like most of them. I'm going to see if my Mum wants any other clothes sews so we can do another swap after this one!
We also took a trip to Ikea and had a thorough mooch around. I picked up a wicker basket to put the projects I'm working on in, hopefully this will stop the cat from sleeping on them.

Yesterday was a fun day, we had several cups of tea while we caught up, and then spent a happy few hours making wreaths. I'm going to try to write up my guide tomorrow, when I'll also post lost of pictures, but here's a sneak peek for now!
In the evening we went to an advent service at a church in central Bristol. This church is the Lord Mayor's personal church and as a council employee I get an invitation to come there at special times of the year, advent being one. Church isn't really my thing, but I do like singing and old places and my Mum is an occasional church goer so it seemed like a reasonable night out. Although it was freezing, the service was amazing. It started in almost complete darkness, and then over the hour we were there they lit more and more candles until everything was bathed in a flickering light. The choir started behind us and performed very ancient pieces, using a style which was a sort of chant with singing interwoven (check out my extensive musical knowledge) and some of it was in Latin. It sent chills down my spine to listen to it in that environment.
After the service we went to Browns for dinner. Browns in Bristol is vaguely deco inside and a great night out. I had mulled wine and a nut roast to thaw myself out, and a stewed pear dessert. All was delicious and a thoroughly good evening was had by all!

So, sleepy time now, wreath post tomorrow.
I also have posts formulating about my check skirt (with the CC41 labels), making your own crackers and all my Christmas present projects, which I feel may have been over enthusiastic and may not be finished in time. Ho hum. So watch this space!

Saturday, 27 November 2010

The holly and the ivy

I've been out for a walk this afternoon, gathering greenery for a wreath I'm going to make tomorrow.
This is a street which leads to the park. Some of my husband's ancestors lived here in the 1920s. Funny as we've bought a house less than 1/2 a mile away now, despite neither of us growing up in Bristol. It's a small world eh?
The snow has stayed all day and the park was very pretty, but deserted. Where were all the kids on sleds? Probably playing on the computer and mugging old ladies. Youth of today, eh?!
This house was the fam house for the whole area, until the Edwardian era when the Bristol suburbs exploded to surround it. This area, Horfield, used to belong to the neighbouring county but it was bough by Bristol in this era to solve some of the slum and overcrowding problems closer in to the city. Apparently the locals weren't too pleased at the idea of a bunch of slum dwellers being moved into council housing near them! The name Horfield means "muddy bit at the corner of the field". Apt, I feel!
I got a chance to wear my skirt out, with my Clarks boots.
I was going to post a bit of a photo guide to making a door wreath. Anyone interested?

Skirts galore

 My apologies at my recent absence, I've mainly been recovering from a cold (actually it was 2 different colds but there were only 4 days between them). Sadly even a simple cold has the power to knock me flat, so what with trying (and failing) to stay in work, I've spent the last few weeks on the sofa feeling sorry for myself.
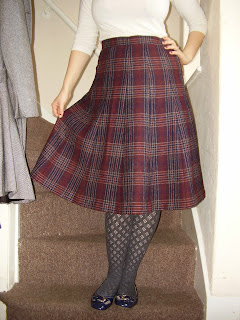
However, I have managed to find the time to make that second skirt from my Simplicity 3688 pattern I mentioned a little while ago and I wore my new CC41 skirt. It's a perfect fit, and a very cozy wool. Here are some pictures, though I have a planned post for later in the weekend giving more information about this skirt - watch this space!


The sewing of my skirt went as smoothly as the brown skirt I made, although I put in an invisible zip rather than a lapped zip, again. I will try a lapped zip soon, promise! I'd recommend this pattern to anyone who's looking for a simple and attractive skirt. I'm going to tackle the trousers soon and I'm hoping they'll be just as simple.
Like the lables? I've sewn one into all of my handmade pieces and hanging together they make quite a good show. My non-sewing friends who were over while I was putting them in were so impressed I felt like the cleverest person in the room. Go me!
The button and the zip are recycled from my Nan's stash. Proper vintage!
Pardon the cat hair. It tends to get everywhere, especially when the little one tries to 'help' my work...

I top stitched in white to try to give the skirt a bit of a feature, but there are 2 minor issues. First, the stitching is too thin. I should have doubled up on thread but I didn't think about that till I'd finished. Secondly, the weight of the fabric has meant where the top stitching is has formed stiff seams down the skirt. It has given the skirt a bit of an odd way of hanging in places, but as I said, it's a minor problem.
The thick wool has made the skirt really heavy and I'm sure it'll perfect for the snow we've had today! I don't think I remember ever seeing snow before Christmas, it's quite exciting! It's a bit worrying too, since we rarely get snow in the UK, the heavy falls of last winter took us a bit by surprise and there was chaos as everyone took a free holiday was unable to get to work. Hopefully the lesson's been learnt and things will go a bit more smoothly this year.
Still, it's been blimmin cold here and sitting in bed has been a somewhat chilly affair. It's made me think about bed jackets! I was going to join in on the 'winter boots' posting, but all the best options have been well written about already (see Retro Chick, Tea with the Vintage Baroness and Snoodlebug) so I'll spare you a repeat of that. Bed jackets, though, are a reasonably original topic.
For those of us who spend a lot of time in bed, reading or blogging, our delicate shoulders and decolletage can get somewhat chilly. Even if you've borrowed your Granddad's jammies, nothing can beat the duvet covered warmth of your bottom half. Unless, that is, you have a quilted bed jacket!
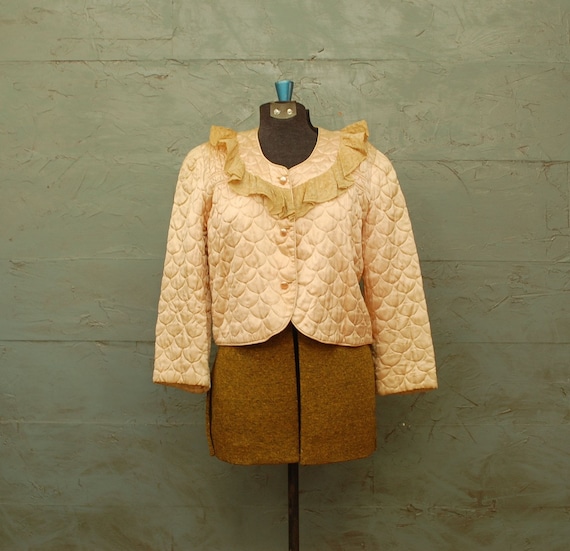
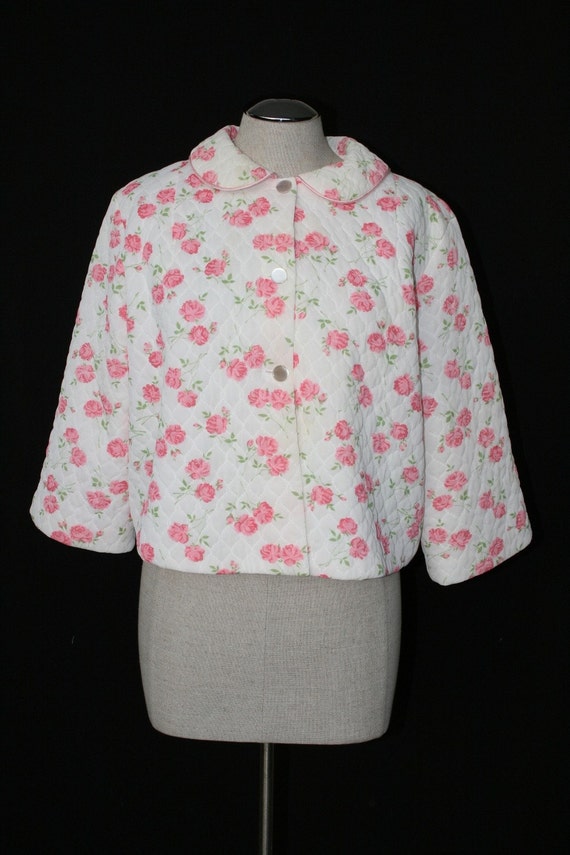
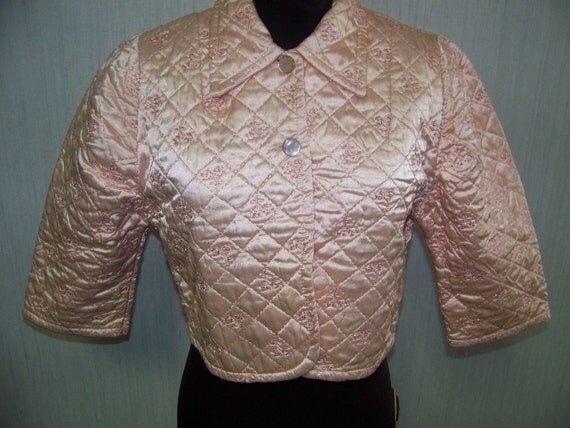
Bed jackets always make me think of either glamorous 30s film stars, taking breakfast in a decadently oversize bed, or old ladies. I'm hoping to lean more to the former in mine, so I'll be going for a delicate fabric and quilting it gently. I had a look at what was on Etsy and came up with 3 very pretty and not at all Granny-ish options.
Click the picture to go to the shop.

I love the frivolous lace collar on this - I suppose a bad jacket doesn't have to be totally practical!

This could pass for a regular jacket, it's very sweet.

The embroidery on this one is so pretty. More frivoloty!

Dozens of vintage bad jacket knitting patterns for only $3 at Karen's Variety.
I love how cozy this one looks. I wish I could knit!
The hood is just perfect on this pattern from the book Vintage Gifts to Knit.

And no fewer than 3 patterns at Eva Dress.

So many choices! Does anyone have a glam way of keeping warm in bed?

Wednesday, 17 November 2010

Ah, rainy days. Does anyone else shop when there's nothing else to do? I've been trawling etsy for lovely things and came across lots! I thought I'd share some of my favourites.

Perfect for the Christmas party of your dreams. Mulled wine, sparkling lights and Clark Gable. And it's available from the lovely FabGabs!

 What a coat. Warm, practical and stylish. Can't you see it strutting along the highstreet with bags of presents tucked under one arm? Available here

I struggled with myself over whether to buy this dress or not. The waist is about 1" too small. From past experience I know that I will not be able to lose the weight in the next 4 years and that the dress will just hang there till I decide to sell it on. Sigh. It's still available here

I'm noticing a colour theme arise here... So sad this skirt is a bit too small for me. Get it here

Walking in the woods on the last crisp sunny day of Autumn. Or maybe in town at Christmas time. These beauties are perfect! Too small for me, and here

I bet you're impressed I've held out and not spent any money...ooops. I thought this skirt would be a perfect wardrobe staple, and it's got the CC41 lables and original hang tags! Ahhh, suddenly the weather seems unimportant! I bought it from this lady in Bath, who also has some very nice wool fabric going cheap!

*Just so you know, I don't have any association with any of the shops I've listed.*

Tuesday, 16 November 2010

Two weddings

Do you ever have one of those days when humanity seems to be a wonderfully warm and happy thing? Today was like that for me.
First came the news of Prince Willam and Kate Middleton's engagement. As a confirmed Monarchist, I'm over the moon about this new. They're young, beautiful and in love. She's a real 'girl next door' and I think she'll do wonders for the family as a whole. I wish them every happiness and, of course, I can't wait to see the dress!

Then, on the front cover of my morning Metro, I saw this.
Down the bottom was a tiny line saying 'this is a genuine proposal'.
How cool is that? The cover of a national newspaper?!
The full story is here and is very sweet and touching. Nothing like a bit of romance to brighten your commute eh?

When I arrived home tonight I found a parcel waiting for me - it was my new stockings from What Katie Did. I love how beautifully they wrap their deliveries.

Also arrived today were my clear glass baubles (ooh er). I'm planning to use them to make some pretty Christmas decorations of my own, inspired by the ones sold at the Jane Austin Centre.
 I'm not sure what to do with the rest (I bought 6!) but there are lots of ides around. I'll keep you updated with what I decide on.


Monday, 15 November 2010

Monday again?

What a week! For the second time in a month I've been out past my bed time. What is going on in Bristol?!
This particular outing was in celebration of my darling husband's 30th birthday. I've been organising the surprise party for a few weeks now and am happy to report that it all went swimmingly. He was totally taken aback by finding 14 of his friends from around the country in a Bristol pub and spent the whole evening grinning like a loon, as is demonstrated suitably by this photo. Also, I wasn't kidding about the pale skin - I think I may be undead.
After the pub we went for some karaoke, which was more fun than I could have expected. 


In other news, I won a splendid cook book! Jen but nevery Jenn has generously given me her wonderous 10pm Cook Book, featuring such delights as Frank n' Bean Bake. I promise to make and eat at least one dish from this book and will be posting photos.
Following my guiden to cross stitch, I decided to stitch a christmas sampler for my work Secret Santa. I've drawn a woman from Finland and so decided to stitch her a Finnish inspired 'Happy Yule' picture. According to the magical interweb, Christmas in Finland features a crown with candles, so I've put one in the centre. There is a pair of reindeer and some Nordic inspired geometric shapes...However, my knowledge of Finland is limited to roughly where it it is in Europe, so if any of my readers have any clever suggestions, I'd welcome them! I see that I have readers from Sweden, Russia and Denmark, so I'm hoping that someone out there might have some ideas about Finnish things to embroider!


I've also started work on a patchwork quilt I'm making for my Nan for Christmas - I've cut the pieces out using my brand new cutting mat and rotary cutter (I can't tell you how much fun I've had slicing things up) and I'll start stitching soon. Through the magic of technology I've mocked up how it might look when I'm done. It's looking good already!

Now, if you'll excuse me I'm off to play some of my Husband's Fallout New Vegas. Awesome!

Sunday, 14 November 2010

A beginner’s guide to Cross stitching - Part 2

Shopping

If part 1 sounded like a lot to think about, don’t worry. My advice is to go and purchase a kit. These are sold all over the web and at most craft shops. The picture on the front shows the finished image and often gives an idea of difficulty. Inside you’ll usually find (but check on the back of the packet) a needle, a piece of aida the right size, silks all the colours you’ll need and the chart. The chart will be a picture of the image you’ll be stitching, made up of lots of symbols. These symbols will appear somewhere on a key, which tells you which number of thread to use. I find it handy to check every so often that the symbol, code and thread not only match each other, but the picture too. It’s not unknown for there to be a small typo on the pattern and for you to colour the sky in pink. If you buy a kit, you’ll only need to make sure you have scissors and maybe a frame. They start out very cheaply and vary enormously in style, size and difficulty. I’d recommend starting with something small and with a few colours. Samplers can be a good first project, and usually were a girl’s learning piece in ‘Ye Olde times’.

You can also buy the charts on their own. These are much cheaper and some can be downloaded free, but you will have to source your own aida and threads, based on what the pattern recommends. If you do go down this route, thread conversion charts can be found all over the web which tell you which companies’ threads are equivalent to each other. This means you can use an Anchor chart and sew it with DMC threads without ending up with odd colour combinations.

Stitchers, start your engines…

So, you have your kit, you have a cup of tea (or wine, I don’t judge) and you have a sofa on a wet day. How on earth do you get started?
The first thing to go is find your centre. No, not your spiritual centre, the middle of your project. If you look at the chart, you’ll most likely find 4 arrows or heavier lines pointing to the centre of your chart. Get a ruler and a pencil and make a little mark in centre square so you know where this is without having to work it out 4 times because David Boreanaz took his top off in Bones and you got distracted. Learn from my mistakes people. Next, you find the centre of the aida. You can do this by folding the aida into quarters and putting a little pencil mark in the centre, like me. Or, if you’re doing it properly, count the little holes until you find the centre and do a big running stitch all the way down, then turn it round and do the other side so you get a big cross with ‘x’ marks the spot. I prefer to draw on my aida, but remember to make this bit the back!

Next you need a piece of thread. Take the little wrap of embroidery thread and find an end. Holding the wrap in one hand by the loops, gently pull out about 20-24” of thread from the wrap. In theory, this will come smoothly and easily but in reality you may need to take the paper bits off and untangle the thread.

Once you have your cut piece, take a look at the thread. It’s made up of 6 smaller threads. You only need 2 of these. Fray the ends out and take hold of one of these little threads. Now, holding the rest of the string, pull that thread straight out. It should slide out, pulling its friends behind it until it pops clear. Now do that again and put your 2 threads back together. Keep the remaining thread safe and together. Now is a great time to use your thread sorter!

Now thread your needle. There are a couple of ways to start a stitch, and I’ll describe 2 good ones – one easy and one tricky. The easy one involves you tying a small knot in the end of your thread. Find where your first stitch will be and where the rest of the shape will be sewn. From the FRONT of the fabric, sew a few squares away from your start point, somewhere that will be covered by stitches in a minute. Then bring your first stitch up from underneath in the right place and stitch your shape.
The idea is that the bit of thread that’s attached to your knot will be sewn over at the back and held in place by stitches. When it’s firm, you can carefully snip the knot off the top and your’re left with a neat front and back. The harder way to do this is to start sewing from underneath and hold the little tail of thread in place underneath, while you catch it with stitches. I find this a nightmare to do.

The stitches you’re making should all be the same, so the same direction of thread should always be on top. This keeps the work looking a lot neater. The easy way to do this is to sew your whole shape, or one row of it with half crosses and then go back over it, sewing all the other half stitches. I like to do my whole shape in half stitches because then I can abandon the pattern and just go back over my own work, but you might like to finish what you start!
Once you’ve sewn what was in the centre, you can branch out to neighbouring shapes by counting squares outwards on your chart and matching them to squares on your fabric. This is an easy one to get wrong and I suggest counting twice, then once you’ve done the first couple of stitches, counting again! As with everything, the earlier you catch your mistakes the easier they are to rectify!

Once you’ve finished with a colour and need to change to another, turn your work over and sew your remaining thread under a couple of stitches, then snip.

Congratulations, you’re cross stitching!

Branching out

There are lots of fun things you can do with cross stitch. I’m now staring to design my own charts. For this, all you need is some grid paper - just fill in the grid squares in different colours to make your shapes. You can use parts of charts you already own to enhance your own designs, and you can use software to help you. Some even convert photos into cross stitch charts!

Beads can also be added to your ‘top’ stitch to give some more decoration to your work, and there are kits available which include these.

You can use cross stitch to make gifts and enhance other craft works. Embroidery on bed linen, towels and clothes can really add a wow-factor and items like cushions, book marks or even simple pictures, framed can be beautiful gifts. There are 1001 books around to give you ideas, but once you get going you can cross stitch anything!

I’m planning on adding some embellishment through cross stitch to a pashmina I’m buying for my Mother in Law this Christmas!

And if all of this seems too old-ladyish, check out Subversive Cross Stitch

A beginner’s guide to Cross stitching - Part 1

I have been cross stitching for about a year and, as such, can not claim to be any kind of expert. Enthusiastic amateur would probably be about right.

However, I have had to discover a lot of the pitfalls myself and have struggled to find information for the absolute beginner on the internet. Buying a book is of little interest if you’re just ‘giving it a go’ and even then, many books assume a certain level of familiarity with the tools and terms of the trade.

So, I thought I’d put together a little introduction to dipping your toe into the world of cross stitch.

Firstly, why should you cross stitch? For me it’s a way of being artistic without the need for any real talent. Counted cross stitch (I’ll explain these terms later) is essentially the stitching version of paint-by-numbers. You have a grid of fabric, and a pattern with colour codes on and you just replicate it in thread. If you can count and read a chart with symbols that correspond to colours of threads, you can cross stitch!

In addition, it’s quite therapeutic. Patterns grow quite easily and mistakes can usually be easily unpicked or adjusted. The act of gentle concentration can let your mind wander and I usually half watch the TV while I’m doing mine.

The other bonus is the finished item. Embroidery can make a wonderful gift or decorate every day items. Samplers have a wonderful tradition of commemorating events like births and marriages and, like quilts, leave a piece of the crafter for future generations to admire.

Talk the talk

Cross stitch is a form of embroidery, but specifically refers to sewing designs using regular stitched Xs and is done by ‘counting’ the threads in the fabric you’re sewing over. If for your first stitch you go diagonally over 4 threads across and 4 threads up, then this is the count you use as your basis from here on. This is why it’s often called ‘counted cross stitch’. There are aids to getting this right which I’ll cover later.

Blackwork and whitework are techniques often used as part of cross stitch and refer to the usual colours of the thread. Blackwork (always monochrome, but not strictly always black) often uses ‘half crosses’ and lines to pick out line based designs and patterns. Whitework is usually the same colour or close to the colour of the base fabric and is used like blackwork to pick out linear and geometric designs, often in conjunction with drawn thread work (where lines or groups of threads are cut or pulled out of the design). These result in lacey looking designs.

You’ll find reference to ‘charts’ a lot of places. These are the coded pictures which show you where to put your stitches, and which ones colours to use where.

Tools of the trade

You’ll need fabric, of course. This is what you’ll be sewing on to. You can use linen, the wider the weave, the easier the threads are to count! Alternatively, you can use something called Aida. Aida is a woven cloth with gaps between some of the threads, This means that you’re working on a grid and rather than having to count threads, you just use the holes naturally existing in the fabric. Very simple!
Aida cloth is sold in ‘counts’. This count refers to the holes per inch, so 10-count aida cloth would have 10 holes per inch. The higher the count, the closer together the holes are so the more difficult the sewing becomes, but the finer your work appears. Having more squares per inch is essentially like turning up the resolution on your computer. Edges are smoother and everything more delicate. I’d recommend that as a beginner you start with a smaller count – around 14 is a pretty good size.

You’ll also need thread of some sort. You can use fine tapestry wools, although these can be a bit clunky, but it's usual to use embroidery silks, also known as floss. You’ll find them packaged in little wraps in craft shops in a huge array of colours. Each colour has a number, which we’ll talk about later. You can buy metallic threads, but these tend to snag and tangle any chance they get, so my advice is to steer clear until you’re more confident! Like most things, you can buy massive multi-packs of these silks very cheaply. My advice is don’t. The cheap threads look cheap and the better ones aren’t that much money! There are plenty of online shops where you can buy the good makes cheaply and when you need them. A much better investment all round!
You’ll need a needle too. Not much to talk about here. Embroidery needles are blunt at both ends, since you’re not working with fine fabrics, and they have a large eye so that you can get the thick silk threads through. You can buy them gold plated, but other than looking pretty, I don’t see the difference. They do come in different sizes – this will make a difference mainly if you’re using a very fine fabric – you don’t want a hulking great needle going through it. I believe the common needles used are size 24 (again, the higher the number the smaller the needle).

You’ll need some small scissors for snipping tiny loose threads. The metal ones with the birds on are my favourite, but any small and sharp bladed scissors will do.

It also helps to have a thread keeper. This is where you put your thread when you’re not using it. You can use card with holes punched in it, or there are various gadgets out there you can buy. I like these wooden ones from Fobbles.
Remember to write the number of the thread on the keeper! When faced with three different pale green turquoise colours, you’ll pull your hair out trying to tell them apart!

Finally, it’s helpful to have a frame of some sort to help you keep your fabric still. This is less of an issue on small projects, and aida is quite stiff, which helps, but for large projects I go mad if my fabric is moving. You can buy wooden frames where you sew the fabric onto tabs on the frame and then tighten the wood, or you can get plastic ones with little teeth to grip the fabric. You can also use embroidery hoops if you want.

Onwards to part 2...